HC-05 Bluetooth Module Interfacing with LPC2148
Introduction

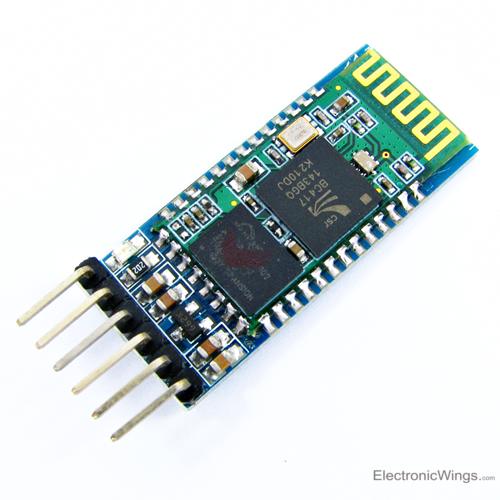
HC-05 Bluetooth Module
HC-05 is a Bluetooth device used for wireless communication. It works on serial communication (UART).
- It is a 6-pin module.
- The device can be used in 2 modes; data mode and command mode.
- The data mode is used for data transfer between devices whereas command mode is used for changing the settings of the Bluetooth module.
- AT commands are required in command mode.
- The module works on 5V or 3.3V. It has an onboard 5V to 3.3V regulator.
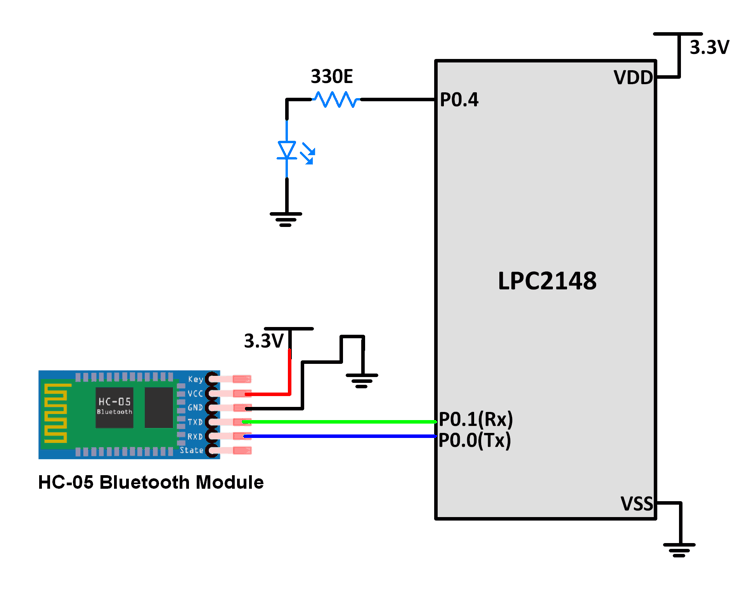
- As HC-05 Bluetooth module has 3.3 V level for RX/TX and the microcontroller can detect 3.3 V level, so, no need to shift transmit level of the HC-05 module. But we need to shift the transmit voltage level from the microcontroller to RX of HC-05 module.
For more information about HC-05 Bluetooth module and how to use it, refer the topic Bluetooth module HC-05 in the sensors and modules section.
For information on UART in LPC2148 and how to use it, refer the topic UART in LPC2148 in the ARM7-LPC2148 inside section.
Interfacing Diagram
 Interfacing HC-05 Bluetooth Module with LPC2148
Note : Default Bluetooth name of the device is “HC-05” and default PIN (password) for connection is either “0000” or “1234”.
Example
Let’s develop a small application in which we can control LED (ON-OFF) through a smartphone.
This is done by interfacing LPC2148 with HC-05 Bluetooth module. Data from/to HC-05 is received/transmitted serially by LPC2148.
In this application when 1 is sent from the smartphone, LED will turn ON. If 0 is sent, LED will turn OFF. If received data is other than 1 or 0, it will return a message to the smartphone that proper option needs to be selected.
Download and install a Bluetooth terminal application on your phone and use it to connect to the HC-05 Bluetooth module.
Data is sent from the Smartphone using the Bluetooth terminal application.
Note : Make sure that \r and \n are not sent along with data sent by deselecting the \r and \n options in the settings of Bluetooth terminal. If \r and/or \n are sent along with 1/0, you will get Select Proper Option output along with LED ON/OFF on the terminal.
Programming Steps
- Initialize UART0
- Configure a pin (here we have used P0.4) as output for LED
- Read data from received from Bluetooth
- Take decision according to data received ( 1 - ON, 0 - OFF, anything else – Select proper option)
Program
/*
  HC-05 bluetooth interfacing with LPC2148(ARM7)
  http://www.electronicwings.com/arm7/hc-05-bluetooth-module-interfacing-with-lpc2148
*/

#include <lpc214x.h>
#include <stdint.h>

void delay_ms(uint16_t j)
{
    uint16_t x,i;
 for(i=0;i<j;i++)
 {
    for(x=0; x<6000; x++);    /* loop to generate 1 milisecond delay with Cclk = 60MHz */
 }
}

void UART0_init(void)
{
 PINSEL0 = PINSEL0 | 0x00000005; /* Enable UART0 Rx0 and Tx0 pins of UART0 */
 U0LCR = 0x83; /* DLAB = 1, 1 stop bit, 8-bit character length */
 U0DLM = 0x00; /* For baud rate of 9600 with Pclk = 15MHz */
 U0DLL = 0x61; /* We get these values of U0DLL and U0DLM from formula */
 U0LCR = 0x03; /* DLAB = 0 */
}

void UART0_TxChar(char ch) /* A function to send a byte on UART0 */
{
 U0THR = ch;
 while( (U0LSR & 0x40) == 0 ); /* Wait till THRE bit becomes 1 which tells that transmission is completed */
}

void UART0_SendString(char* str) /* A function to send string on UART0 */
{
 uint8_t i = 0;
 while( str[i] != '\0' )
 {
  UART0_TxChar(str[i]);
  i++;
 }
}

unsigned char UART0_RxChar(void) /* A function to receive a byte on UART0 */
{
 while( (U0LSR & 0x01) == 0); /* Wait till RDR bit becomes 1 which tells that receiver contains valid data */
  return U0RBR;
}

int main (void)
{
 char data_in;
 UART0_init();
 IO0DIR = IO0DIR | 0x00000010; /* Configure P0.4 as output */
 while(1)
 {
  data_in = UART0_RxChar(); /* Receive data from bluetooth */
  if ( data_in == '1' ) /* If data received is 1 */
  {
   IO0PIN = ( IO0PIN | 0x00000010 );
   UART0_SendString("LED ON\n");
  }
  else if ( data_in == '0' ) /* If data received is 0 */
  {
   IO0PIN = ( IO0PIN & 0xFFFFFFEF );
   UART0_SendString("LED OFF\n");
  }
  else
   UART0_SendString("Select Proper Option\n");
 }
}

No comments:
Post a Comment