LCD 16x2 Interfacing With Arduino Uno
Introduction
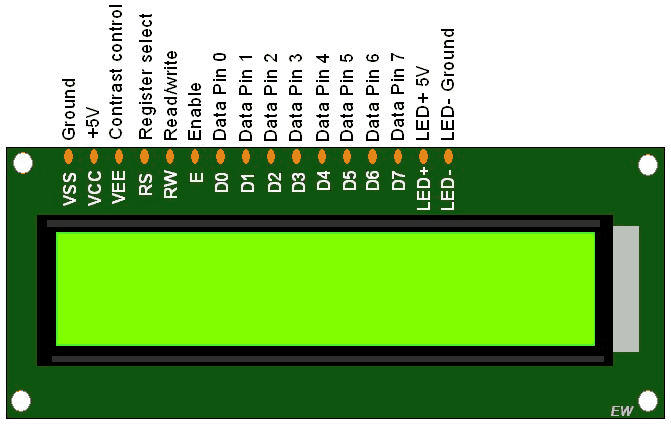
LCD 16x2
LCDs (Liquid Crystal Displays) are used in embedded system applications for displaying various parameters and status of the system.
LCD 16x2 is a 16-pin device that has 2 rows that can accommodate 16 characters each.
LCD 16x2 can be used in 4-bit mode or 8-bit mode.
It is also possible to create custom characters.
It has 8 data lines and 3 control lines that can be used for control purposes.
For more information about LCD 16x2 and how to use it, refer the topic LCD 16x2 module in the sensors and modules section.
Interfacing Diagram
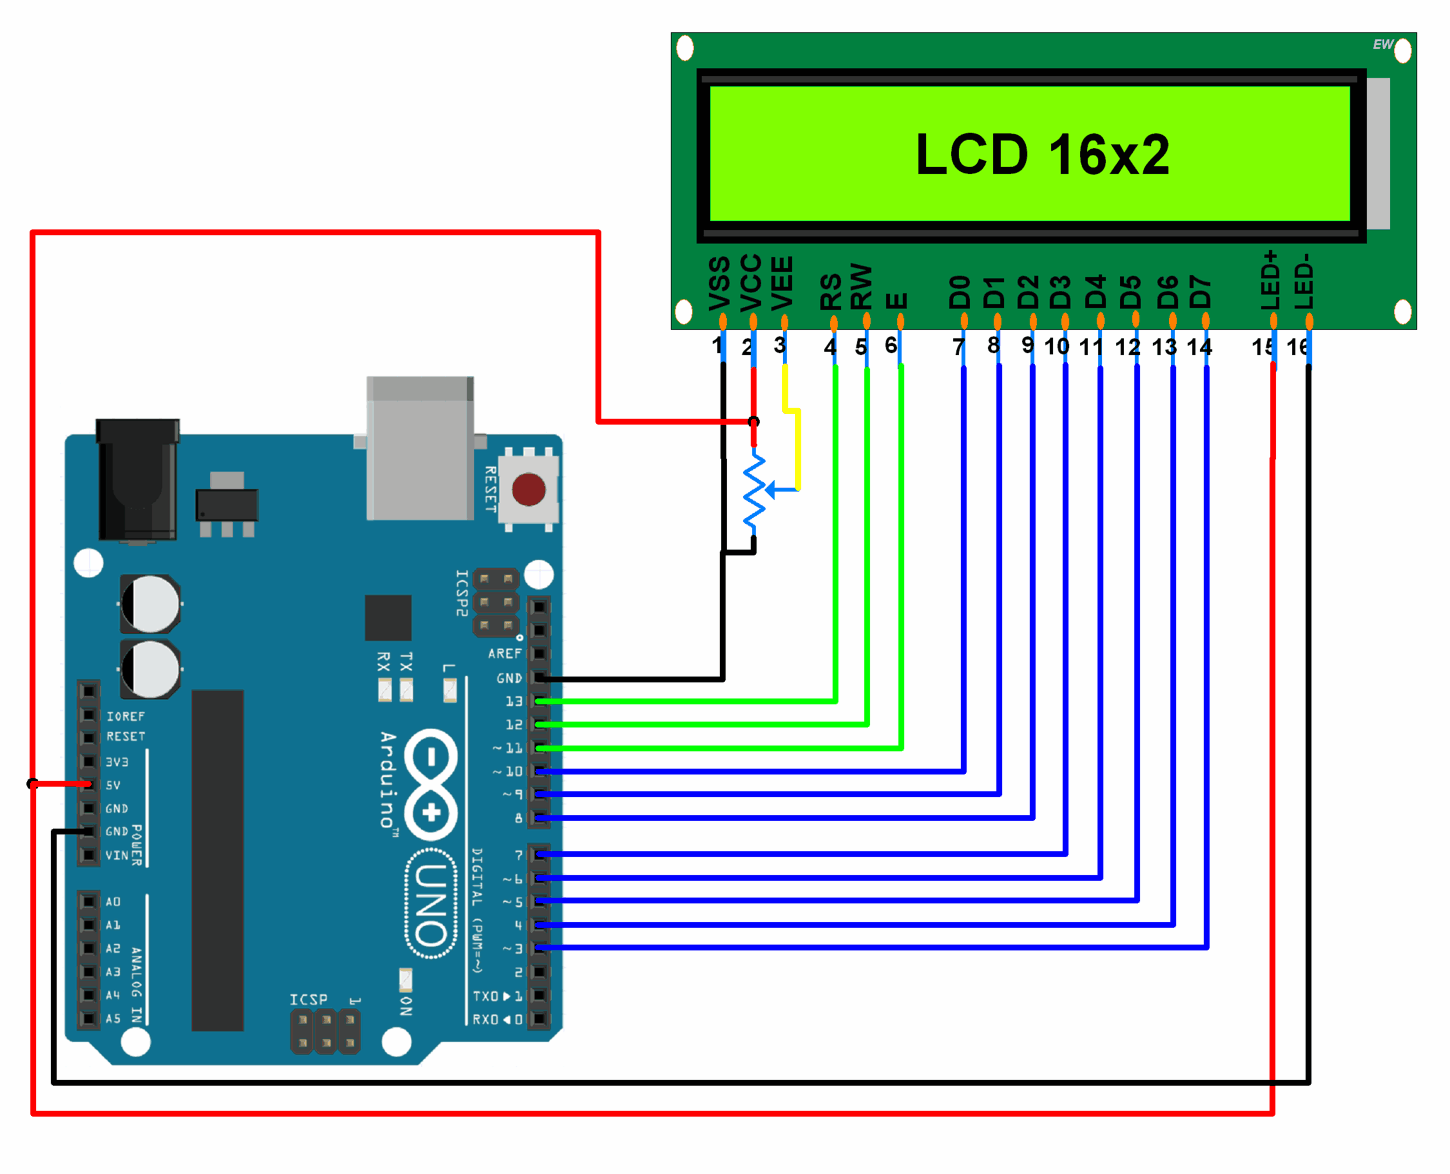
Interfacing 16x2 LCD With Arduino UNO
Example
Displaying data on 16x2 LCD (Custom characters as well as regular characters) in 8-bit and 4-bit mode.
Here, we will be using the built in LiquidCrystal library provided by Arduino along with their IDE for LCDs that are based on Hitachi HD44780 (or compatible) chipset.
Sketch For Displaying Data On LCD (Custom Characters And Regular Characters)
#include <LiquidCrystal.h>
/* Create object named lcd of the class LiquidCrystal */
LiquidCrystal lcd(13, 12, 11, 10, 9, 8, 7, 6, 5, 4, 3); /* For 8-bit mode */
//LiquidCrystal lcd(13, 12, 11, 6, 5, 4, 3); /* For 4-bit mode */

unsigned char Character1[8] = { 0x04, 0x1F, 0x11, 0x11, 0x1F, 0x1F, 0x1F, 0x1F }; /* Custom Character 1 */
unsigned char Character2[8] = { 0x01, 0x03, 0x07, 0x1F, 0x1F, 0x07, 0x03, 0x01 }; /* Custom Character 2 */

void setup() {
  lcd.begin(16,2); /* Initialize 16x2 LCD */
  lcd.clear(); /* Clear the LCD */
  lcd.createChar(0, Character1); /* Generate custom character */
  lcd.createChar(1, Character2);
}

void loop() {
  lcd.setCursor(0,0); /* Set cursor to column 0 row 0 */
  lcd.print("Hello!!!!"); /* Print data on display */
  lcd.setCursor(0,1);
  lcd.write(byte(0)); /* Write a character to display */
  lcd.write(1);
}
Functions Used
1. LiquidCrystal object_name(rs,rw,en,d0,d1,d2,d3,d4,d5,d6,d7)
LiquidCrystal object_name(rs,rw,en,d4,d5,d6,d7)
LiquidCrystal object_name(rs,rw,en,d4,d5,d6,d7)
- This function defines an object named object_name of the class LiquidCrystal.
- rs, rw and en are the pin numbers of the Arduino board that are connected to rs, rw and en of LCD.
- d0, d1, d2, d3, d4, d5, d6 and d7 are the pin numbers of the Arduino board that are connected to data pins D1, D2, D3, D4, D5, D6 and D7 of LCD.
- Example, LiquidCrystal lcd(13, 12, 11, 10, 9, 8, 7, 6, 5, 4, 3). This makes use of LCD in 8-bit mode.
- Example, LiquidCrystal lcd(13, 12, 11, 6, 5, 4, 3). This makes use of LCD in 4-bit mode.
2. lcd.begin(cols,rows)
- This function is used to define the number of rows and columns the LCD has and to initialize the LCD.
- Needs to be called before calling other functions, once the object is defined using the function in point 1.
- Example, for 16x2 LCD we write lcd.begin(16,2). lcd is the name of the object of the class LiquidCrystal. 16 is the number of columns and 2 is the number of rows.
3. lcd.setCursor(col,row)
- This function positions the cursor of the LCD to a location specified by the row and column parameters.
- col is the column number at which the cursor should be at (0 for column 1, 4 for column 5 and so on).
- row is the row number at which the cursor should be at (0 for row 1, 1 for row 2).
- Example, for setting the cursor at the 5th column in the 2nd row, lcd.setCursor(4,1). lcdis the name of the object of the class LiquidCrystal.
4. lcd.createChar(num,data)
- This function is used to create a new custom character for use on the LCD.
- num is the CGRAM location (0 to 7) at which the custom character is to be stored.
- data is array of eight bytes which represent the custom character.
- Custom character can be of 5x8 pixels only.
- Each custom character is specified by an array of eight bytes, one for each row. The five least significant bits of each byte determine the pixels in that row.
- To display a custom character on the screen, write() function needs to be used. CGRAM location number (0 to 7) of the custom character which is to be displayed on LCD is passed as an argument to the write function.
- Note : When referencing custom character "0", you need to cast it as a byte, otherwise the compiler throws an error.
No comments:
Post a Comment